In this assignment you’ll explore a new topic: model checking of distributed systems. We’ll build a bare-bones model checker, apply it to Paxos, and use it to examine various scenarios for Paxos reaching consensus.
When we build a distributed system, we want to check whether it works properly in all cases, even some corner cases that may only occur with a very low probability. One way to check is to randomly run the program many times as you have done for the first four homeworks. However, there is no guarantee that this randomized testing could cover every case. Another approach is to theoretically explore every possibility, which could be achieved by simulating a system by a state machine. Then search algorithms like Breadth First Search (BFS) or Depth First Search (DFS) can be used to walk through all the states and verify the correctness of one’s implementation. The former approach is called fuzz testing, the latter is called model checking.
In this homework, we will consider the whole system (multiple nodes + network) as one state machine. Nodes can handle messages or trigger a timer, both of which will update the system’s internal state. Network is an abstraction of on-the-fly messages half-way from one node to another. When a node sends a message, it will enter the Network, and then the message will be popped up and arrive at its target node. In this state machine abstraction, there are two types of events: message arrival and timer trigger. Every time an event is processed, the current state will evolve to new ones (in most cases, there will only be one state, more details in Part A and B). That is to say, if the current network contains N messages, there will be O(N) new states induced by message arrival. If there are T nodes with active timers, then these timers correspond to O(T) different new states.
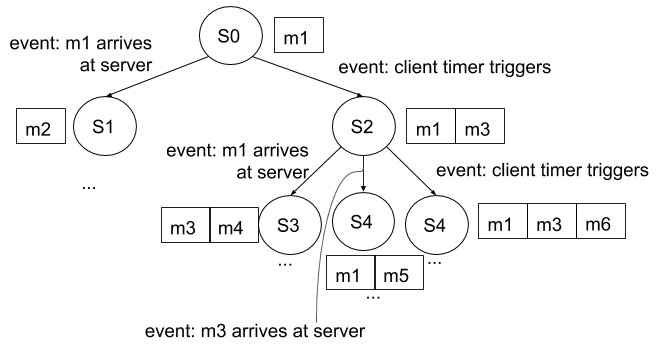
Here is an example: we have a distributed system with a server and a client (i.e. 2 nodes), a message in the network from the client to the server. And the client has an active timer triggered every 10 seconds (as we will see later, absolute time – like 10s or 1 min – does not matter). When the timer is triggered, the client sends a new request message to the network. Let’s assume this is the initial state (S0). Then this state has two events that could occur next: (1) the message in the network will arrive at the server, (2) the client timer will be triggered. A model checker will explore both these possibilities. This image illustrates this branching from S0. On the branch that chooses to explore the first event, then the server will handle this message and send back a response message into the network, and a new state (S1) is formed. On the branch that chooses to explore the second event, the client will send a new request to the network even though there is already an outstanding message from the client to the server. Let’s call this new state S2. Now let’s consider S2: S2 actually has three events: 2 message events and 1 timer event. As you may be curious, why is there another time event given that we just triggered once? Since the messages in a network have unbounded arrival time, it is possible that these messages could take a long time to arrive at the server, in which case the timer could be triggered many times in the interim. The timer event at S2 simulates this scenario. However, this scenario is unlikely to be covered through fuzz testing.
Aside from the concurrency between message and timer, the timers in two servers are independent. This is true even if the timer in Server A is triggered every 1 second and the timer of server B is triggered every 10 seconds. In reality, it is possible that Server B triggers more times than A because the timers in different nodes are not synchronized except by messages.You never know whether two clocks are walking at the same rate without communication (A famous example is the Twin Paradox by Albert Einstein). In terms of the state machine here, even if two timers in two servers have different remaining time to be triggered, both of them can be an event leading to the next state.
The way you would model check a distributed system is to: (1) specify your system’s state machine by implementing these next-state transitions, (2) define some scenarios under which you would like to test your system (including the initial state, a set of final states you’re looking for, and a set of invariants that must hold), and (3) run a (say) BFS algorithm to explore all possible events and interleavings up to those final states while checking the invariants. This will test that under all possibilities, your system’s evolution from the initial state preserves the invariants.
The homework is composed of three parts, which you will need to complete by the homework’s deadline. In Part A, you’ll finalize the implementation of a bare-bones model checker we developed for this homework. In Part B, you will specify the Paxos state machine in the context of the model checker’s interface. In Part C, you will check the correctness of your Paxos state machine under a few scenarios akin to those discussed in the Paxos lecture.
Please refer to Assignment 0.
As the previous assignments, this homework is run under the Go version of 1.23.1. The directory of this homework can be put anywhere in your computer given the feature of the Go module.
This section walks you through how to build a model checker with the abstraction of state machines. pkg/base directory contains the skeleton code of the bare-bones model checker we built for this class. Essential components of states are nodes, messages, and timers, which are defined as interfaces. Please check their definitions in node.go, message.go, and timer.go. Clients in client.go are special nodes that contain a function called SendCommand. This function is used to require a node to do something (e.g. send a message). event.go defines the common events in a state, which will be used when a state evolves to new ones. state.go includes the definition of a state and the search algorithms to explore states. For Part A, you will implement the functions in state.go and test your code using a simple distributed protocol located in pkg/pingpong directory.
Get yourself familiar with the code in the base directory.
Then go to the function BfsFind, which is used to explore all the states from an initial state by BFS. This function has been implemented for you, except one command NextStates.
Move to the NextStates function. As you can see this function only has a basic skeleton and asks you to fill in the remaining parts.
As shown in the Introduction both message arrival and timer triggering will lead to a new state. For the message arrival, there are five situations: (a) local call (a message sent to oneself), (b) network partition and messages never reach, (c) a message is dropped during transmission, (d) a message arrives normally, and (e) a message arrives but the message is not deleted from the network (i.e. it is duplicate and may arrive again later). Case (a, b) has been implemented for you, please work on (c) - (e). If case (a) or (b) does not occur (i.e. no local call + partition), then the arrival of a message should create at least 3 new states. If you have M messages on-the-fly, you are expected to create at least 3M new states.
Why handling a message may result in more than one state? Think about a server who randomly replies either 0 or 1 to a message. In the real world, there is only one response with value of either 0 or 1, but in the view of state machines, we need to consider both responses as possible next states. Therefore, handling one message could lead to two next states. pingpong/server.go has a case leading to multiple states, please check its MessageHandler.
For the timer, you should iterate every node and trigger their next timer; every timer should lead to a new state. If you have N nodes with timers, you should generate N new states in parallel.
Your implementation of the NextStates should build on the interface of the state components (e.g. nodes, messages, …). Please read the comments of these interfaces and understand the semantics of their member functions.
Once you complete the above functions, go to the pingpong directory and use the test cases to debug your state implementation. Run the test cases in state_test.go first. Once every test case passes, try those in pingpong/search_test.go.
Since the test cases are deterministic, you get credits only when you completely pass a unit test. No partial credits will be given when you fail a unit test.
Hint: Both nodes and messages should be immutable. If you need to modify a node or message, please copy it first.
Hint: Pay attention to the semantics of MessageHandler and TriggerTimer. Neither of them will modify the original node. Instead, they will create and return a list of modified servers, which reflect the result of handling a message or timer.
Hint: When a node handles a message or timer, it may send back responses as messages to a network. In this homework, this is achieved by implementing the HandlerResponse function. For example, when a server calls the MessageHandler method, it will generate one or more new nodes. For each new node, the messages sent back to the network can be acquired by calling the MessageHandler.
// a old node handles a message and generate new node(s)
newNode = oldNode.MessageHandler(message)[0] // suppose only one new node
// new state is created from an old state
newState := oldState.Inherit(event)
// update the new state with the new node
newState.update(newNode) // you need to design this part
// new state receives the messages from the new node
newState.Receive(newNode.HandlerResponse())
Hint: Use the Inherit function of State to create a new state. Then modify the nodes and messages of the new state to handle an event.
Hint: When checking if an interface is nil, use IsNil(x) instead of x == nil.
Now you are familiar with the basic components of the model checker, you will implement the Paxos servers on it, for the ultimate purpose, in Part C, of verifying if your Paxos implementation is correct. We include some basic tests in Part B to help you check the basic workflow of your Paxos implementation. In Part C, you will model check Paxos’s behavior in more complex scenarios.
The Paxos server interfaces on the model checker are located in pkg/paxos/server.go, and message definitions are located in pkg/paxos/message.go. You’re expected to understand what each structure stands for and implement the message handler for Paxos servers MessageHandler, and the entry point for Paxos StartPropose.
The message handler takes in a message sent to the server, processes it, and generates corresponding new nodes representing the new status of the server. For example, if the message is a ProposeRequest then we should call the acceptor handler of the server and demonstrate the expected behaviors when a Paxos server receives a Propose request from a proposer.
To start with Part B, we could first focus on implementing the acceptors of Paxos. Based on the Paxos protocol, everytime an acceptor receives a message, it just responds to the message accordingly. Then we can work on the proposers. Think about it as a state machine, what should a proposer behave when it receives a message. It’d be helpful to ponder over how many new states can be generated when a new message is received by a proposer. A noteworthy scenario would be that a proposer just received the majority of OK responses from peers, it may wait for the rest responses or enter the next phase. In the real world, these two states are exclusive by timeout. A server will not wait for all the responses when they exceed a certain limit of time. However, in the view of distributed systems, absolute time does not matter, so both states are possibly next states.
The last place to work on is the StartPropose. It is the starting point for proposing a value for consensus. The proposed value is InitialValue if no v_a is received. The first task of this function is to renew the proposer’s fields. Then send ProposeRequest to all its peers, including itself.
To make life easier, we run the model checking as a single goroutine without multi-threading: the nodes send/receive messages in the network to mimic RPCs and no actual RPCs are involved. The model checker handles the state transitions and here we focus on the behaviors of individual nodes.
Unit tests for your Paxos server implementation are provided in pkg/paxos/unit_test.go. They test the functionality of Paxos server message handler for the proposer/acceptor in Propose, Accept, Decide phases, and compare the returned new states with expected ones to check a basic level of correctness of your implementation. You should be able to produce the following results before proceeding to Part C.
$ go test -run TestUnit
Test: Proposer - Send Propose Request ...
  ... Passed
Test: Acceptor - Handle Propose Request ...
  ... Passed
Test: Proposer - Handle Propose Response ...
  ... Passed
Test: Acceptor - Handle Accept Request ...
  ... Passed
Test: Proposer - Handle Accept Response ...
  ... Passed
Test: Acceptor - Handle Decide Request ...
  ... Passed
PASS
ok      coms4113/hw5/pkg/paxos  0.187s
Hint: Unlike your implementation of Paxos from Assignment 3, in this assignment you are paying more attention to the state machine view of Paxos. It requires a somewhat different way of thinking that is valuable to hone for future designs and implementations of distributed systems you might do. Specifically, you will be expected to think about how states evolve: given the current state and the message applied or timer tick, what will the next state(s) be.
Hint: The infrastructure State handles state transitions and here we only focus on how a node evolves with the arrival of an event (message, timer).
Hint: The tick of TimeoutTimer simulates a situation where a proposal procedure is timeout and restarts again.
Hint: We can tell what kind of message that message handler receives by a switch clause over message.(type) and enters the corresponding handler.
Hint: Consider send-to-oneself command as a message over network as well, with from and to fields all being one’s own address.
Hint: Every object is immutable. When generating new nodes, use server.copy() to create a copy of the current node and modify the copy only.
Thus far, you’ve: implemented a bare-bones model checker and implemented the Paxos state machine in the model checker’s interface.
In Part C, you will use the model checker to test several scenarios from the examples provided in lecture Paxos scenarios(slides 23-40). The tests check that there exists a path from a given starting state to a given end state that passes through several intermediate states.
All the scenario tests exist in pkg/paxos/scenario_test.go. Some basic tests are well designed, you could run them directly to verify if your implementation is correct. These basic tests are TestBasic, TestBasic2, TestBfs1, TestBfs2, TestBfs3, TestInvariant, and TestPartition1. Some of them are modified from the slide mentioned above.
Besides running these well-designed tests, you are required to implement a few scenario tests to show your Paxos is correct. You are asked to use predicates to guide a Paxos system to reach some states covered by the slide. The place to put your predicates is tesr_student.go
Please read the function reachState and you will know how the predicates work. Here is a brief introduction to the predicates: since the number of states explored by BFS will grow really fast, we should set up a few intermediate states as the checking point of BFS to reduce the possible states. That is to say, at any intermediate state, we use BFS to find the next state, and then do the BFS from the next state, so far and so on. Every time a state fulfills a predicate it will be set as a new starting point of BFS. Thus, the predicates will guide the program to reaching target states set by us without exploring too many states.
An example is provided on how to design the intermediate state predicate. Please read the TestPartition2 case. This test explores a scenario where S1 and S3 cannot talk to each other while S1 first acquires the consented value of “v1” and then S3 also learns the same consented value. The state predicates are coded in checksForPartition2 function. The predicates first guide the program to reach consensus by P1 and then reach the consensus again by P3. Another example is TestFailChecks. This test case is not graded, and it will give you more hints to design predicates.
The first scenario you need to complete is TestCase5Failures. You are required to fill in a list of predicates so that the program first has A2 rejects P1 and then have S3 be the first server knowing a consensus is reached. Your predicates should be completed in the function ToA2RejectP1 and ToConsensusCase5 at test_student.go.
The second scenario you need to complete is TestNotTerminate. You should guide the scenario test to first reject all the Accept requests from S1, then reject all the Accept requests from S3, and reject all the Accept requests from S1 again. Please fill in your predicates in the NotTerminate* functions at test_student.go.
The third scenario is TestConcurrentProposer. It is from the slide. You need to guide the program to first let P1 propose, and then P3 proposes, but P1 get all rejects during the Accept phase. Finally P3 get All Oks from the Accept phase and reaches the Decide phase. Your predicates should be completed in the function concurrentProposer1 and concurrentProposer2 at test_student.go.
You hand in your assignment as before, but all three parts at once.
$ git commit -am "[you fill me in]"
$ git tag -a -m "i finished assignment 5" a5handin
$ git push origin master
$ git push origin a5handin
You should verify that you are able to see your final commit and your a5handin tag on the Github page in your repository for this assignment.
You will receive full credit if your software passes the tests we mentioned before when we run your software on our machines. We will use the timestamp of your last a5handin tag for the purpose of calculating late days, and we will only grade that version of the code. (We’ll also know if you backdate the tag, don’t do that.)
All test cases are all-or-nothing.
pingpong/state_test.go: 4 tests
pingpong/search_test.go: 7 tests
Part A: 11 tests contribute to 40%. Each failure will lead to deduction of 4%, i.e. you need to pass at least two tests to get credits.
paxos/paxos_test.go: 1 test.
Part B: 1 test accounts for 10%.
paxos/scenario_test.go: 8 well-designed tests, 3 to-be-completed tests

well-designed tests: TestBasic, TestBasic2, TestBfs1, TestBfs2, TestBfs3, TestInvariant, TestPartition1 and TestPartition2
3 to-be-completed tests: TestCase5Failures, TestNotTerminate, TestConcurrentProposer.
Part C: 8 well-designed tests account for 20%. Each failure will lead to 2.5% deduction. 3 to-be-completed tests account for 30%. 10% each.